Showing posts with label OPI. Show all posts

Friday, February 25, 2011

St. Patty Patchwork

Okay, so I'll take a break from the Crackles *sigh* lol. Well since St. Patricks Day is coming up, isn't it, and I have a brand new St. Patty's Day polish from Five Below, I figured I should do a green Patchwork mani. For this I used OPI Gargantuan Green Grape, Funky Fingers Erin & Sinful Black on Black.

I started with 3 coats of Gargantuan Green Grape, 3, yep you heard right 3 freaking coats, man I forgot how much of a PITA this was. Oh well.


Then I taped them off, and added the Funky Fingers Erin. Such a pretty sparkly green, which I can say, I don't own anything like it. I then added a coat of SV.


For my final color, I added my fave go to black from Sinful. and another coat of SV


 I am loving this soooo much!!!! If you are looking for a How-To on this, I have one posted up above in my 'Tutorials' tab.

Wednesday, February 23, 2011

OPI: Collezione Katy Perry disponibile tra pochissimo sullo shop!


Ragazze finalmente e' arrivata!

La nuovissima collezione Katy Perry per OPI ispirata al video Carlifornia Gurl's sta per essere resa disponibile sullo shop della OPI Italia!

E' un'edizione limitata quindi già immagino che andrà a ruba!!!

La collezione e' composta da 4 smalti e uno smalto nero effetto Shatter (Crackle')....


Qui potete vedere un video dimostrativo ufficiale OPI sullo Shatter e sui colori in genere...che meraviglia ragazze!


Monday, February 14, 2011

I couldn't resist this Texan

Yep, so originally I just knew I didn't any of the new OPI's from the Texas collection. Weeeellllll......Okay I fibbed. I walked into Ulta, and there was the whole collection. Out of curiosity, I went to check them out. Umm...why have I never been told how pretty It's Totally Fort-Worth It is?!?!? Seeing it in person, I was able to see the tiny amount of pink shimmer, and I knew I was buying it!

*edit* Sorry I don't know how I forgot this, but the base I used here is Sally Hansen Wet Cement


Then came 1 coat of It's Totally Fort-Worth It. can you see the hint of the pink shimmer?!!??!


Saturday, February 12, 2011

Feeling a tad girlie today

So every once in a while, I'll crave just a simple regular french mani. I really only like to do them when my nails are shorter, and then add a little something extra to make it fun. I had ordered some nail art items off of eBay, and when they came in, I just had to use the little bows! They are the perfect size IMO, and just make me feel so girly on this mani, but not over the top :) This is the mani, that left with me on my weekend getaway.
For this I used 2 coats of 10 - Pinky Promise, #415 for my base, and OPI Alpine Snow Matte for the tips.


This was pre bow :)


Here is what the nail art wheel looked like. I can't wait to use the pearls!!! Now, they are messy, and soooo dang staticy, that when you go to slide it open, it looks like little bee bee's are flying out. Grrrr, but I finally managed to get them all settled down. I might even end up switching them all out.

Tuesday, February 8, 2011

looking for a sexy blue???

This is the other Sally Hansen Inst-Dri that I picked up along with Slick Slate. It's called Co-Bolt Blue. I'm in love *sigh*. It's soooo bright and glowy!!! I wanted to Konad with it, but decided to do a quick swatch for you guys first.


Here is my base for my mani, OPI No Room For The Blues, another great blue! Excuse the weird pictures. For some reason the camera INSISTED on turning my skin red for this. I took over 100 pics, and almost threw my camera, lol.


Then using a Bundle Monster plate, finished off my mani :)


Saturday, February 5, 2011

Rachel....This one's for you :P

So I received a very sweet email from a fellow polish lover, that asked me about trying Sally Hansen Celeb City with matte tips. She suggested I try it with OPI Lincoln Park After Dark Matte, but since I had used that one so much lately, I decided to grab Orly Matte Vinyl, they both look like a matte black, IMO. I just LOVE Orly's Vinyl collection! Here it is with Celeb City used as the base and as the tips :)


Thanks for the idea Rachel, and also for reminding me that I had Celeb City :P

Wednesday, February 2, 2011

Some days....even I need simplicity

While on my lunch break, I reached into my purse, to see what I had with me to play with. Well I pulled out my OPI Mod About You & OPI Significant Other Color, which I have yet to use. So I slapped them together. I just wasn't in the mood to get complicated, probably, because I have sooo much work to do, and didn't even want to take my whole lunch hour. I like the combo though, it gives just enough uummph, to Mod About You, and also matched my new giraffe rain/snow boots, pink tank and black sweater really well.


Tuesday, February 1, 2011

Back to Basics....

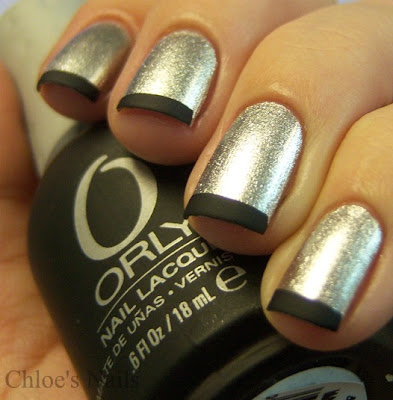
So this might not exactly be basic to some of you, but it was one of my very first 'edgy' manis I did, lol. I never used to wear dark colors. I actually think this mani is what helped me fall in love with the matte polishes. Now, I know this is posted in my 'Playing Catch Up' post, back when I started this blog, but I decided to re-do it. For this I used OPI Lincoln Park After Dark Matte and just Seche Vite for the tips, to make them extra shiny :) I also noticed that my older version's pic was floating around on Tumblr a while ago, and some post had wrong info about it! This is not done with a black polish and matte top coat, although you could very well achieve the same mani using those, nor are the tips photoshopped in any way.  I do have to say, that this mani, when I wear it, gets me more compliments than any other so far.


Monday, January 31, 2011

Possible V-Day mani and Konad tutorial

I decided to do a tutorial on nail stamping, since I have had a few request. This is the mani that I did. For this I used China Glaze Naughty and Nice as the base. Then for the red/pink lip image, I used Sally Hansen Color Quick pen in Red Chrome, Silver lips are China Glaze Millenium, and the tips are OPI Lincoln Park After Dark Matte.

I get all my items together first


This is the image plate I'm using


Once you choose the image, you take your polish and and cover the image.
Then with your scraper, you scrape over the image, removing the excess polish


Then with your stamper, you place the rubber part and press, transferring the image to your stamper

Excuse the pup hair, I didn't remove it before I took the pic, eeek


Finally, all you do, is place the stamper above your nail, where you want the image to appear on your nail, and in a rolling motion, press it onto your nail.


The best tip for stamping, is to only use 100% acetone. After you stamp, wipe the scraper and stamper onto a cotton ball/pad, that has been soaked in acetone. I use a green coaster, and pre-soak the cotton pad in acetone, and set it onto the coaster. Then after I scrape, I swipe the scraper onto the pad, removing the polish, and then after I stamp, I wipe the stamper on the pad as well. You should also clean the image plate in between each stamp. Although I'm guilty of not doing this, lol. Oh and you do need to work fairly quick, because the polish, since being so thin on your stamper, dries quick.

Here I did the rest of my nails, and then did it over again with China Glaze Millenium.


Once I'm done, I take my mani double pointed q-tips, dip them in acetone, and clean up the excess polish from stamping, around my nails. I then do a coat of SV, and TADA


Last of all, I added tips in OPI Lincoln Park After Dark Matte