Showing posts with label Konad. Show all posts

Friday, February 4, 2011

REALLY...... %^$#@!*!@#$#

Sorry for the screaming headline, but OMG, I'm convinced my middle finger hates me, I mean really hates me! Just as it's finally growing out, I ram it into the corner of our coffee table!!! I never break any other nail, just that one. Grrrr.....

*deep breathe* Okay, anyways, for this mani I used China Glaze Tree Hugger, which has been in my untrieds forever and China Glaze Cherish for the Konad.

Here is 2 coats of Tree Hugger, I love the green shimmer in this so much.


and for the Konad

Tuesday, February 1, 2011

More polka dots!!

** If you have emailed me, or plan to, I'm having trouble sending messages. I can open your message, and attempt to reply, but it won't send. I'm not sure why, but hopefully it will be fixed soon, I'm so sorry**

While I was at Sally's picking up some Gelous for a friend, I saw they still had the free China Glaze with SV top coat purchase!! YAY, so I picked up Secret Peri-wink-le, and I don't know why I never grabbed this before!! I love it!! After I did my mani with it, I just had to spice it up, I can't seem to leave any mani alone, lol. For the polka dots I used Sally Hansen Blue Blast :P

I just adore this combo and the subtlety of the polkie dots, from afar :)


Monday, January 31, 2011

Possible V-Day mani and Konad tutorial

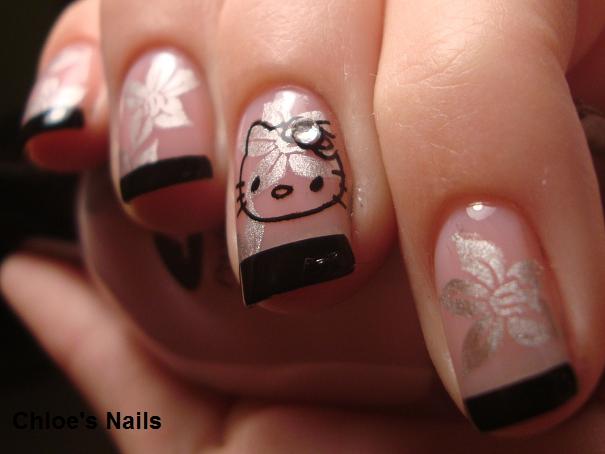
I decided to do a tutorial on nail stamping, since I have had a few request. This is the mani that I did. For this I used China Glaze Naughty and Nice as the base. Then for the red/pink lip image, I used Sally Hansen Color Quick pen in Red Chrome, Silver lips are China Glaze Millenium, and the tips are OPI Lincoln Park After Dark Matte.

I get all my items together first


This is the image plate I'm using


Once you choose the image, you take your polish and and cover the image.

Then with your scraper, you scrape over the image, removing the excess polish


Then with your stamper, you place the rubber part and press, transferring the image to your stamper

Excuse the pup hair, I didn't remove it before I took the pic, eeek


Finally, all you do, is place the stamper above your nail, where you want the image to appear on your nail, and in a rolling motion, press it onto your nail.


The best tip for stamping, is to only use 100% acetone. After you stamp, wipe the scraper and stamper onto a cotton ball/pad, that has been soaked in acetone. I use a green coaster, and pre-soak the cotton pad in acetone, and set it onto the coaster. Then after I scrape, I swipe the scraper onto the pad, removing the polish, and then after I stamp, I wipe the stamper on the pad as well. You should also clean the image plate in between each stamp. Although I'm guilty of not doing this, lol. Oh and you do need to work fairly quick, because the polish, since being so thin on your stamper, dries quick.

Here I did the rest of my nails, and then did it over again with China Glaze Millenium.


Once I'm done, I take my mani double pointed q-tips, dip them in acetone, and clean up the excess polish from stamping, around my nails. I then do a coat of SV, and TADA


Last of all, I added tips in OPI Lincoln Park After Dark Matte


Sunday, January 30, 2011

Hello Kitty Funky French Nail Art thanks to Born Pretty

Here is another item that was sent to me for review from Born Pretty. It's their nail stamping image plate, M71, stamper & scraper.
Here is the mani I did.....How freaking cute is this!?!?1 You know what....I might actually leave this on all day! Yep, that's a record for me, lol.

Here is what I received. The stamper, scraper and the image plate


Most image plates have a very thin film that you might not even see. Just make sure to remove it.


and here is my nail stamping set-up, lol. I've taken control of one of our TV trays, can you tell. It works perfect though for stamping. Then I always make sure to have 100% acetone, my green coaster, for the cotton ball/pad soaked in acetone, image plate, stamper, scraper, and polishes I plan on using. Oh and after I took this pic, I decided to not use the Konad polish in white, but instead used black.


Grandpa, the pup, well 16 years young, we adopted a few months ago, just had to watch, lol.

Before I started stamping, I applied 2 coats my base coat of Brand 10, color #415, Pinky Promise


Now on to stamping. I used the flower image on the plate first, and used China Glaze Millenium for them. Then I used the cute Hello Kitty image, and Konad polish in black for that :)


Finally I did my black tips with Sinful's Black on Black and added a tiny rhinestone to her bow :)


I LOVE this!! What do you guys think???

Also don't forget, if you plan on ordering from Born Pretty, don't forget to use my code: CHLOEK31 to receive 10% off.

Sunday, January 23, 2011

Stamping with Sally....

Good morning ladies!! This is a mani I did last week, pre-break, I'm still so mad, lol. For this I used Sinful's Black on Black for the base, and a Sally Hansen Color Quick Chrome polish pen, in Turquoise Chrome, for the image. I used the Bundle Monster plate BM20. These Sally Chrome polish pens, work GREAT for stamping!!


Friday, January 21, 2011

Gold & Green Funky French

So to take a break from the Water Marbling, I decided to show you a funky french I did last week. Oh and before we get to this mani..............I BROKE A NAIL!!! Grrrr, I slammed it in a car door :( It broke my middle finger nail, down far!!! I'm debating on putting a fake on, or ljust letting it be, and grow out. I don't know, this sucks!! Okay, whew, rant over, now on to the mani. For this I used the brand 10, color #415 for the base, Ulta Urban Jungle for the tips, and Claires 14 Karats for the Konad.


This is 2 coats of the base, 10, #415


Then with the Konad on :)


And the final mani :)