Monday, May 31, 2010

On Memorial Day


In Flanders fields the poppies blow
Between the crosses, row on row,
That mark our place; and in the sky
The larks, still bravely singing, fly
Scarce heard amid the guns below.

We are the Dead. Short days ago
We lived, felt dawn, saw sunset glow,
Loved, and were loved, and now we lie
In Flanders fields.

Take up our quarrel with the foe:
To you from failing hands we throw
The torch; be yours to hold it high.
If ye break faith with us who die
We shall not sleep, though poppies grow
In Flanders fields.

-John McCrae, 1915


I remember every memorial day weekend growing up my mom would always have a crepe paper poppy attached to the strap of her purse, and I remember that whenever I was with her, she would give me a dollar to donate so i could have one too. I loved those little paper flowers, though I hardly understood their significance way back then. Memorial Day is for remembering, for honoring, and for thanking those who have given their lives, or are risking their lives to make sure that we have the rights and liberties that we have here in America. My grandfather was a veteran, and I remember visiting his and my grandmother's graves every Memorial Day and looking at the flags pushed into the earth of their graves. My sister played TAPS on her trumpet at the cemetery, so it was mostly my mom and I, since it was her parents. I suppose that I'm blessed in the fact that not many of my loved ones (friends or family) are in any branches of the military, I have a couple of friends serving in various branches, and for that, I thank them, but I never have to worry about a family member not coming home, like so many others in this country. Regardless of that fact, I extend my thanks and eternal gratitude to those serving this magnificent, though sometimes flawed, country of ours. In honor of our armed forces, I did the logos for the Marines, the AIr Force, the Navy, and the Army, as well as the American flag accented with what else, a poppy. :) I apologize that the logos aren't perfect, but I did what I could with the space I had. ;)


I used:

Thumb: American flag & poppy

American Apparel Cotton as a base with CND Anchor Blue for the blue, and China Glaze Salsa for the red of the stripes as well as the poppy. for the black I used American Apparel Hassid, and for the green, I used CND Green Scene .

Index: Marines

American Apparel Passport Blue as a base, with China Glaze 2030 from Khrome Collection for the gold, and China Glaze Salsa for the red, over Sally Hansen All the White Stuff, so the red popped.

Middle: Air Force

China Glaze Millennium as a base, with CND Anchor Blue for the logo.

Ring: Navy

Sally Hansen All the White Stuff as a base, with American Apparel Passport Blue, China Glaze 2030 from Khrome Collection for the gold, Sally Hansen All the White Stuff for the shield, with CND Anchor Blue for the blue on the shield, and China Glaze Salsa for the stripes on the shield.

Pinky: Army

American Apparel Hassid as a base, with Sally Hansen All the White Stuff for the star, and outlined in American Apparel Manila.

Topped everything off with 2 coats of Seche Vite top coat.

Pizzi, trina e merletti....ma sulle unghie!!!


All'epoca di Jacklin Kennedy erano ancora di moda, pizzi, trine e merletti ed i vestiti erano veramente un gran capolavoro....guardate anche voi.

Oggi andare in giro così sarebbe un tantino stonato...anche se a me piacerebbe tanto tornare indietro per poter vivere quella moda almeno per un giorno.

Però ho scoperto che il pizzo lo posso ancora usare in un modo abbastanza particolare.....sulle unghie.....
sono rimasta affascinata....stile antico e metodi moderni..mica male l'abbinamento.

Vi faccio vedere cosa ho trovato in giro per il web.


Dai sono troppo carine, sfiziose, alternative....
da quello che ho visto il procedimento è abbastanza semplice.

Come si realizzano

Si applica il primer e si catalizza

Si stende il gel e prima di catalizzare si posiziona sull'unghia il pizzo, modellato in precedenza in base alla lunghezza ed alla forma dell'unghia.

Si catalizza e si eliminano gli eccessi, se ci sono, ai lati.

Si applica il sigillante e si catalizza di nuovo.

Insomma ci si può credo veramente divertire tanto!!


Per le più pigre o per chi non ha tanto tempo esistono i pizzi anche in versione adesiva.

Già pronti solo da tagliare a misura.


Immaginateli sopra ad uno smalto o uniti a piccoli brillantini.

Questa foto in particolare mi piace da morire.

Sarebbero perfette per una sposa un pò eccentrica.

Ma qualcuna di voi le ha mai provate??

Io domani vado a comprare l'occorrente!!!!


Sunday, May 30, 2010

Lime Line


Today is another simple one, my apologies- it's been a super busy weekend- I made about 10 dozen cookies along with a bunch of other stuff!! :-P I used another of the new ULTA polishes that I got, In the Limelight, a lime green foil finished polish. Anyway, sorry for the short write-up, it's been a long day and I think its about bedtime.


I used ULTA In the Limelight as a base, with American Apparel Hassid for the lines. Topped it all off with 2 coats of Seche Vite top coat.

Swatch: KIKO No. 298

(above camera flash - below natural light)

This color is very pretty. It's actually very sheer but it's perfect for layering.
Below you can see it above some black, blue and white.


KIKO 298 above a black creme, a blue shimmer and a white creme.

Occhi Blue d'estate...con Kiko StickEyeShadow


E' estate e fa caldo... ma con i Kiko stickeyeshadow non ci sono problemi di tenuta...

Oggi avevo voglia di blue (ma va? )...ed ecco il risultato...

Il trucco e' sfumato con i polpastrelli e i due colori usati sono semplicemente


  • il blue scuro n° 17 applicato sull'angolo della palpebra e sfumato con le dita verso l'interno e sulla piegatura. In più passato anche sotto l'occhio per 3/4 della lunghezza.
  • il bianco n°01 applicato al centro dell'occhio come punto luce, sotto le sopracciglia e sotto l'occhio sul lato interno e a fondersi con il blue.
  • Mascara Kiko Super Color wp nella colorazione Blue.
  • Interno occhio matita nera della Debby
Per oggi mi sono separata dal mio primer della Urban Decay perche' con questi ombretti non ce ne e' bisogno...

Trovo questi in stick favolosi come colore, come durata e applicazione, ve li avevo già decatanti nell'articolo in cui li avevo swatchati tutti:Kiko stickEyeshadow : swatch and review

Vi consiglio di non farveli scappare!

In più indosso il mio bijoux preferito, la mia mezza ala d'angelo ;-) della Miss Sixty:


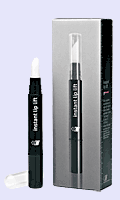
HighTech Cosmetics, la conoscete?


Io non la conoscevo affatto e l'ho vista per la prima volta in farmacia.

Ma la vendono solo li?

Ho visto diversi prodotti che sinceramente mi hanno molto interessato come Instant Lifting Eyeshadow e Instant Volume Lip.

Sono veri e propri trattamenti in versione trucco, ci si fa belle in tutti i sensi.

Vi spiego come agiscono!


Come funziona Instant Volume Lip.
E' innanzitutto un rossetto liquido che permette in 15 minuti di aumentare del 35% il volume delle labbra.....non l'ho ancora provato quindi non vi so dire se l'effetto labbra carnose è reale!

Il principio attivo è l'acido jaluronico. Delle microsfere penetrano nella pieghe delle labbra e catturano l'acqua presente. Esercitano una pressione verso la superficie attenaundo le imperfezioni, creando quindi un effetto volumizzante immediato.


Si trova in vendita in queste 7 tonalità ed il costo è di circa 28,00-30,00 euro.


Passando al reparto occhi, oltre al mascara volumizzante, al gel per attenuare borse ed occhiaie ed al trattamento lifting per rassodare palpebre e zone perioculari troviamo Instant Lifting Eyeshadow.

La confezione è predisposta con pennellino applicatore, si passa sull'occhio e lo sguardo diventa aperto....la palpebra si solleva.

Ci sono 6 diverse colorazioni.

In questo caso i componenti sono oltre all'acido jaluronico, Osilift, Particelle Sferiche e Biosaccaride Gum-4.


Penso proprio che lo proverò.....ma certo il prezzo non è da poco. L'ombretto costa più o meno 33,00 euro!!!!!


Saturday, May 29, 2010

ULTA-mate!


Today's manicure is simple, because I was busy busy today! :( I did get an AWESOME new Ulta Professional polish though, so I had to use it- unfortunately it was the only one left in the cardboard display (it's part of a special collection), and there is no label on it, so I don't know what the name of the color is, but I plan on investigating tomorrow... so not to worry, I'll update it in the info. It's gorgeous- a vivid pink with a LIME GREEN reflect?! Sign me up. Awesomeness. LOVE. Anyway. They also had in the same display a lime green FOIL polish- which had a label (In the Limelight), which is gorgeoustastical, I can't wait to use it too...I LOVE foils.


I used ULTA Professional awesome color with no label as a base, with China Glaze Cherish applied with Bundle Monster plate BM03 just to the upper corner of each nail. :) Topped it off with 2 coats of Seche Vite top coat.

Mini KIKO Haul


Another mini haul, from KIKO this time. Since KIKO polishes are now €1.90 instead of €3.90 I'm taking advantage of this and buying all the colors that I wanted before, even if I have to say that at this point I bought almost everything that catched my eyes.
I have 32 KIKO polishes at the moment on a total of 105 shades available but a lot of color are extremely close to each others and there isn't a large variety of finishes (basically just cremes, shimmers and glitters).
Tomorrow afternoon I'm going to swatch these and the ones from yesterday if it's sunny. I also have some swatches of other KIKO polishes in my hard disk but I still have to edit the pics so you will see them in the next few days. I'm trying to swatch all of my KIKO polishes but they are a lot...

The following pics are from my lovely sister. She just recently started to love nail polish and stopped biting her nails.
This afternoon she put on ORLY Pixy Stix and proudly went shopping.
Then she asked me to konad her thumbs with CG Awaken and plate m3.

NOTD: Banana Candy


At first I wanted to do a tutorial for this nail art but it's so easy that I don't think is needed.
I used LAYLA 101 for the base and added some dots using KIKO 290, 295 and 296.
I took inspiration from the "lemon nails" in the latest issue of Nail Up.

Tutorial #034: Gradient Pink French


Super easy and lovely!!

What you need: some red hearts for decoration.

Colors:

  • Base Coat: KIKO White strong&shiny No.05
  • Milky White: KIKO No.205
  • Pink: Unknown polish (no number, name or brand)
  • Top Coat: KIKO No.03
How to:
  1. Apply your base coat.
  2. Apply a milky white polish, better with some gold shimmer.
  3. Apply a light pink polish (better with gold shimmer) on the tip of your nails. Apply a second coat if needed. If you want you can add some docorations like red hearts.


NOTD: Pink & Orange French {three versions}


Another recent NotD.
I wore this for my mother's birthday last week.
I never tought that orange and pink could match this well but when I tried this I really liked it.
I liked it so much that I made two versions of this mani and also a pedi.
I took inspiration from this nail art I saw in a mag (don't remember which, sorry!).

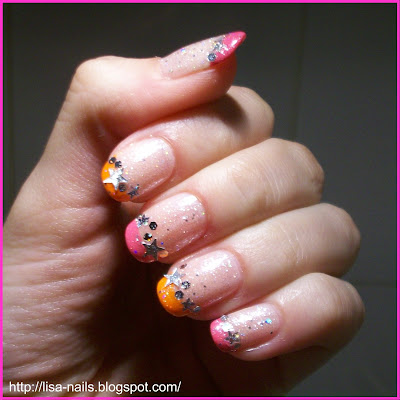
In the first two pic is the "basic" version. I used KIKO no.280 and Miss Sporty no.140 for the french and topped everything with KIKO no.228, a silver glitter.


Here is the "bling" version with some stars and hexagonal silver glitter.


Here the whole look. For the pedi I just alternated pink and orange.

What do you think? Want to see more matching mani and pedi?

NOTD: Green Spring


After seeing the green spring mani at LACQUERIZED I wanted to try it too!
This is my result!
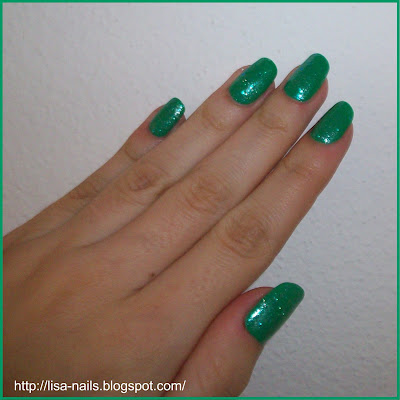
I used KIKO no.296 as a base and then I applied a coat of KIKO no.163, a fine glitter with turquoise shimmer and at last KIKO no.170, with iridiscent fish scale glitter that flashes between green and purple.


Friday, May 28, 2010

Schlongs & Songs


(sorry dad) :-P Tonight I'm going to a show called Naked Boys Singing here in Las Vegas. If you haven't heard of it, it precisely what it sounds like- buff, attractive men singing in the nude. Should be a good time. ;) So, today, for shits and giggles, I decided to attempt to paint the poster on my nails. What is it with me and naked men on my fingernails, seriously? :-D BTW, it is effing HARD to paint tiny little naked dudes on fingernails. HARD! (hee hee) Luckily, because I added the 'censor' bar to make it PG, I didn't have to paint any tiny penises.... or is it penii? ;)

the inspiration:


the nails:


I used OPI Who the Shrek Are You? as a base, with American Apparel Cotton as a base for the dudes and the orange stripe. For the orange stripe, I used essie Tart Deco, for the boys, I used MAC Abalone Shell, then shaded with Nubar Milk Chocolate Creme. For the black bar, I used American Apparel Hassid. Topped it all off with 2 coats of Seche Vite top coat.

How do you like your boys to sing? :-D

Voglia di viola...

Stasera ho aperto lo scrigno dei miei smalti e ho pescato questi...avevo voglia di mettervi un viola..ma come vedete il range e' ampio...

Ho appena tolto il lilla di BarryM quindi ho escluso i lilla dalla selezione (sennò ci facevamo notte ;-) )

Consigli? ^_^


Da sinistra verso destra:
  • Layla 155
  • ChinaGlaze Agent Lavender
  • ChinaGlaze Grape Juice
  • ChinaGlaze Spontaneus
  • ChinaGlaze Nasty

Da sinistra verso destra:
  • Collistar Viola Lacca
  • Kiko 291
  • Kiko 293
  • Kiko 292
  • Kiko 278
Aspetto suggerimenti...intanto metto la base ^^